Get Started
Prerequisites
Unreal Engine 5.3+ (UnrealSharp 0.2 was developed using 5.3, so may work on earlier versions)
Install .NET 8.0 SDK
Install UnrealSharp to your project
Clone this repo and place UnrealSharp in the ProjectRootDirectory/Plugins folder (make the Plugins folder if it doesn’t exist) in your Unreal Engine project.
Compiling UnrealSharp
Compile the plugin as any other Unreal Engine plugin using the IDE of your choice.
Launching UnrealSharp
Launch your Unreal Engine project through the solution file or .uproject. Once Unreal Engine has fully opened, this prompt should appear:
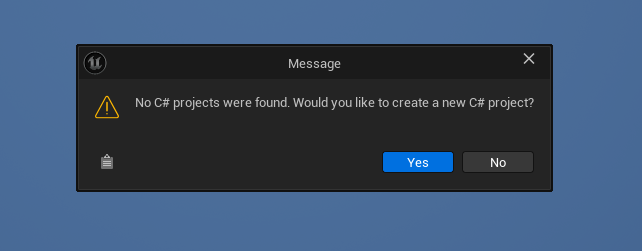
Press Yes and the Create C# Project menu should appear like this:
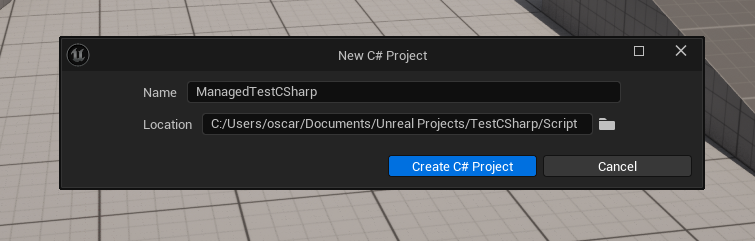
You can choose a custom project name, and the project will be located in the ProjectRootFolder/Script directory. Subdirectories within Script are also supported, allowing you to organize your project files in any folder structure you prefer.
By default it’ll create a new folder for each new project!
Quick Access to UnrealSharp’s editor features
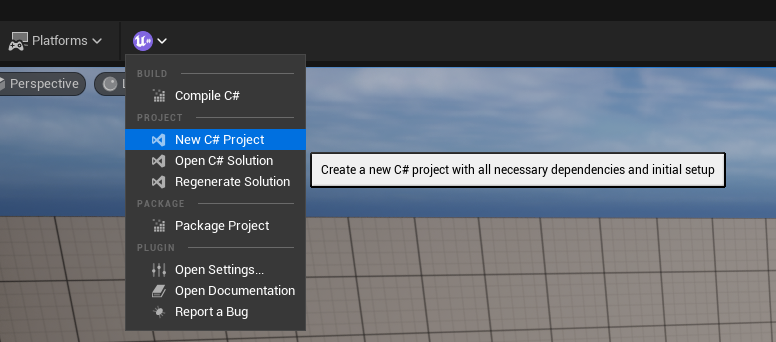
If you lose track or need to start over, you can easily access the project setup feature again.
Navigate to the top of the editor viewport and you’ll find the UnrealSharp logo. Click on New C# Project and you’re back on track.
Project Setup Completed
Once the project is created and the solution opens, you will see two projects in the Solution Explorer.
ProjectGlue: This project contains the automatically generated glue code that is related to your project’s API. It is critical to the interop process, and it will be regenerated with each build. Therefore, do not modify or directly use this project. Any changes made here will be overwritten.

Start Scripting
Make a class like this:
using UnrealSharp.Attributes;
using UnrealSharp.Engine;

namespace ManagedCropoutUnrealSharp;

//Currently UClass attribute is a must for the editor to recognize the class
[UClass]
public class AMyTestClass : AActor
{
    //Optional constructor
    protected AMyTestClass()
    {
    }

    protected override void BeginPlay()
    {
        PrintString("Hello from C#!");
        base.BeginPlay();
    }

    [UProperty(PropertyFlags.BlueprintReadOnly)]
    public int MyInt { get; set; }

    [UProperty(PropertyFlags.BlueprintReadOnly)]
    public float MyFloat { get; set; }

    [UProperty(PropertyFlags.BlueprintReadOnly)]
    public string MyString { get; set; }

    [UProperty(DefaultComponent = true, RootComponent = true)]
    public UStaticMeshComponent MyRootMesh { get; set; }

    [UProperty(DefaultComponent = true)]
    public UStaticMeshComponent MyOtherMesh { get; set; }

    [UProperty(DefaultComponent = true, AttachmentComponent = nameof(MyRootMesh))]
    public UStaticMeshComponent MyMeshAttachedToRoot { get; set; }

    [UFunction(FunctionFlags.BlueprintCallable)]
    public void MyFunction(bool myBool, int MyInt)
    {
        PrintString("Hello from MyFunction!");
    }
}
Now go back to Unreal Engine and it should compile your code and your class should be able to be found in the editor.
Debugging
Now you can close Unreal Engine, and start the project through the C# project by pressing F5, and you will attach a debugger to the Unreal Engine instance, and you can start debugging.
Rider Steps
If you’re using Rider, you need to do an additional step to be able to debug.
Click on the run configurations up in the right corner:
And then choose .NET / .NET Core on the Runtime setting.
Hit Apply and OK. Now you can press F5 and start scripting! 😃